Step 5: Checking files
Common information
To tell DoubleKiller which files you want to remove, you have to check them
in the result list by clicking their file icons ( ).
A cross will appear, indicating it is marked for removal (
).
A cross will appear, indicating it is marked for removal ( ).
Apart from checking the files manually, you can use the buttons to the left
of the result list. They offer various ways of checking a bunch of files at
once.
).
Apart from checking the files manually, you can use the buttons to the left
of the result list. They offer various ways of checking a bunch of files at
once.
For more information on checking files manually, especially using keyboard shortcuts,
see Check files, but please read the section
below first. On this page's bottom you will find two examples of checking files
automatically.
Note: You can start checking files even while the scan is still running.
Hint: Which files may I delete?
If you did not scan a folder just to find certain duplicate files you were
aware of, but instead wanted to clean up your hard disk, the worst idea is to
carelessly use the check first files of group button and
delete the files - this way you will most probably delete one or more files
you should rather keep. This is especially the case if you were not following
the suggestions in Step 2 and scanned
something else than your personal file collections.
The safest way not to delete the wrong files is to check the files manually
and only check the files you know - do not check any file of which you are not
perfectly sure if it is used by Windows or some software. To be on the safe
side, do not delete any files that you cannot open e.g. in your image viewer
or multimedia player, because it might contain data belonging to some application.
If you are quite sure such a file is not needed anymore, e.g. because you think
it belongs to an application that has already been deinstalled, you can try
moving it to Windows' Recycle Bin or a backup folder and just continue working
on your PC for some weeks to make sure everything is running fine before finally
deleting it.
Example 1: Check all files within a folder
In our example we scanned all MP3 files in 'G:\Mp3 &
Ogg' and 'F:\Sounds'. Let's assume we now
want to delete all duplicate MP3 files of 'F:\Sounds'
because they are supposed to be in 'G:\Mp3 & Ogg'
and nowhere else. You could now run through the list and manually check all
files that are in 'F:\Sounds' or its subdirectories.
But fortunately, there is a feature designed to do exactly that (and something
more): Try the button by criteria... to the left of the
result list.


This will bring up a dialog titled check / uncheck by criteria.
The only thing you need to do here is checking path matches
mask and entering F:\Sounds\* in the box
below.
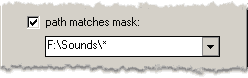
Click OK and all files located in 'F:\Sounds'
and its subdirectories are checked automatically.
Example 2: Check the oldest files of each set
Note: If you were already trying the example above, make sure to remove
the checked files to tidy up the result list before following this example
as well. Otherwise you might end up with duplicate sets that are completely
checked and you will have to manually uncheck files.
Checking the oldest files of each set can be automated very easily. Firstly
you have to make sure the oldest files of each set appear first. To do so, simply
sort the result list by date by clicking the Date column
header.

Now that the results are sorted properly, you can use the check first
files of group button to check all but the very last file of each set.

Because of the sorting, this equals to checking all but the newest file of each
set.
 See
also
See
also
 Check
files
Check
files